09 Sep 2015
As an avid Vim user, I am always searching for faster ways to do things.
When I learned about the amazing power of Ctags,
I was excited that I finally found a way to quickly move to the definition of a method or class.
I generated my Ctags once, and then I was fine for a while. But then, after the code changed enough,
I would keep running into methods and classes that weren’t in my tags, and therefore I couldn’t
jump to their definition. This is where generating them automatically comes in handy.
While there are probably a ton of ways to automatically generate Ctags, my personal favorite now is
using Git hooks. Git hooks are basically little scripts that get
run after some event happens in Git. For example, the one I am going to use in this post is
post-checkout. This means the script is run every time you checkout a branch in Git.
Now that we know about Git hooks, all we need to do is add a line to some Git hooks to generate
Ctags whenever certain things happen in Git. I personally set it up to generate Ctags after I checkout
a branch in Git. This can be done in two simple and elegant lines of bash that you run from the root
of the git repo:
  echo "ctags -R --languages=ruby ." > .git/hooks/post-checkout
  chmod +x .git/hooks/post-checkout
The first line writes the ctags command to the post-checkout Git hook file.
The second line just makes the post-checkout hook executable. Of course you can customize the options
for the ctags command as you please.
It’s that simple! If you want to generate Ctags more often, you can just run the same two lines
above but replace post-checkout with whatever hook you want to use.
19 Mar 2015
Example on Page:
 Skip to the code
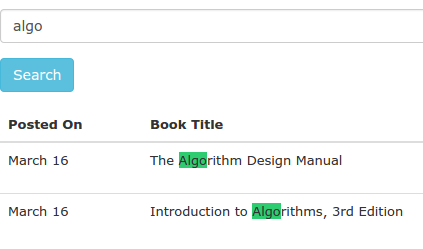
Make your search user-friendly
Searching is key a function of almost every site you use, and every site you will ever build. For some sites, the search functionality can be the difference between keeping a user or losing them to a competitor. Google’s only function is search, and they’re worth over $300 Billion. It’s important to make your search as user-friendly as possible.
A great example of extremely user-friendly search is Product Hunt. They use Algolia, which provides simple fuzzy matching, real-time results, and highlights the matching words on the page. Their pricing is steep for low-budget projects, but it’s simple to implement your own matching word highlighting!
Implementation
First, we need to grab what the user searched and break it up into individual words. This helps with basic fuzzy matching. Otherwise, it would have to find an exact match of what the user typed in the search box. This is easy in JavaScript:
// Maps "Test Search" to ["Test", "Search"]
var words = $('#search-field').val().trim().split(/\s+/);
Then, we need to find the search terms on the page. The jQuery :contains selector is great for this, so we need to map our words array into a jQuery selector.
// Maps ["Test", "Search"] to ":contains(Test), :contains(Search)"
var query_string = words.map(function(word) {
	return ":contains(" + word + ")";
}).join(', ');
Now we have everything setup to grab the DOM elements that match our query. I ran a jsPerf benchmark to see the most effecient way of running this query and this was the best by far. This assumes you have your search results as a child of a li element, but this can easily be rewritten with td, or whatever you have it in.
var all_items = $('li');
var matching_items = all_items.children(query_string);
Almost there! We have all of our matching search results, we just need to do the highlighting! Unfortunately, this is the hardest part. We can use a regex replace to wrap the search terms with a span that will highlight them on the page.
The regex will be generated from words, the array we had above that held the words the user searched for. We will use the g (global), and i (case-insensitve) flags so that the regex will replace all matches in the string, regardless of case.
// Maps ["Test", "Search"] to /Test|Search/gi
var regex = RegExp(words.join('|'), 'gi');
Then, we use this regex to find our search terms, and wrap them with a span with the class highlight, which we will define to give them a background color. The $& will be replaced with the matched text.
// Maps "Test" in DOM to "<span class='highlight'>Test</span>"
matching_items.each(function(_, item) {
	var j_item = $(item);
    j_item.html(j_item.html().replace(
			regex, "<span class='highlight'>$&</span>"
	));
});
For the highlight class:
.highlight {
	background-color: #2ecc71;
}
The final code:
// Maps "Test Search" to ["Test", "Search"]
var words = $('#search-field').val().trim().split(/\s+/);

// Maps ["Test", "Search"] to ":contains(Test), :contains(Search)"
var query_string = words.map(function(word) {
	return ":contains(" + word + ")";
}).join(', ');

var all_items = $('li');
var matching_items = all_items.children(query_string);

var regex = RegExp(words.join('|'), 'gi');

// Maps "Test" in DOM to "<span class='highlight'>Test</span>"
matching_items.each(function(_, item) {
	var j_item = $(item);
    j_item.html(j_item.html().replace(
		regex, "<span class='highlight'>$&</span>"
	));
});
Gotchas
You might notice if you try to use this, it is case-sensitive. This is because :contains is case-sensitive. To get around this, we have to write our own case-insensitive :containsi. I borrowed this code from this StackOverflow post.
$.extend($.expr[':'], {
  'containsi': function(elem, i, match, array)
  {
    return (elem.textContent || elem.innerText || '').toLowerCase()
    .indexOf((match[3] || "").toLowerCase()) >= 0;
  }
});
Then just replace the :contains above with :containsi.
